SpringCloud简介
Spring Cloud是一系列框架的有序集合。它利用SpringBoot的开发便利性巧妙地简化了分布式系统基础设施的开发,如服务注册中心、配置中心、消息总线、负载均衡、断路器、数据监控等,都可以用SpringBoot的开发风格做到一键启动和部署。SpringCloud将目前各家公司开发的比较成熟、经得起考验的服务框架组合起来,通过SpringBoot风格进行再封装屏蔽掉复杂的配置和实现原理,最终给开发者留出了一套简单易懂、易部署和易维护的分布式系统开发工具包。微服务是可以独立部署、水平扩展、独立访问(或者有独立的数据库)的服务单元,springcloud就是这些微服务的大管家,采用了微服务这种架构之后,项目的数量会非常多,springcloud需要管理好这些微服务。
本文主要将通过手动搭建一个Spring Cloud分布式项目学习SpringCloud中的各个组件。
本文采用Idea搭建SpringCloud项目,文中使用的工程和服务都是整个项目的模块。结构类如下:
Maven主工程
基于对maven依赖管理的考虑,新建一个maven主工程,主要用来约定整个工程项目中的所有服务使用到的依赖版本。新建服务spring-cloud-parent,pom.xml如下
<?xml version="1.0" encoding="UTF-8"?>
<project xmlns="http://maven.apache.org/POM/4.0.0"
         xmlns:xsi="http://www.w3.org/2001/XMLSchema-instance"
         xsi:schemaLocation="http://maven.apache.org/POM/4.0.0 http://maven.apache.org/xsd/maven-4.0.0.xsd">
    <modelVersion>4.0.0</modelVersion>

    <parent>
        <groupId>org.springframework.boot</groupId>
        <artifactId>spring-boot-starter-parent</artifactId>
        <version>2.3.2.RELEASE</version>
        <relativePath/> <!-- lookup parent from repository -->
    </parent>

    <groupId>com.lin</groupId>
    <artifactId>spring-cloud-parent</artifactId>
    <version>1.0-SNAPSHOT</version>

    <properties>
        <project.build.sourceEncoding>UTF-8</project.build.sourceEncoding>
        <project.reporting.outputEncoding>UTF-8</project.reporting.outputEncoding>
        <java.version>1.8</java.version>
        <spring-cloud.version>Hoxton.SR6</spring-cloud.version>
    </properties>

    <dependencies>
        <dependency>
            <groupId>org.springframework.boot</groupId>
            <artifactId>spring-boot-starter-test</artifactId>
            <scope>test</scope>
            <exclusions>
                <exclusion>
                    <groupId>org.junit.vintage</groupId>
                    <artifactId>junit-vintage-engine</artifactId>
                </exclusion>
            </exclusions>
        </dependency>
    </dependencies>

    <dependencyManagement>
        <dependencies>
            <dependency>
                <groupId>org.springframework.cloud</groupId>
                <artifactId>spring-cloud-dependencies</artifactId>
                <version>${spring-cloud.version}</version>
                <type>pom</type>
                <scope>import</scope>
            </dependency>
        </dependencies>
    </dependencyManagement>

    <build>
        <plugins>
            <plugin>
                <groupId>org.springframework.boot</groupId>
                <artifactId>spring-boot-maven-plugin</artifactId>
            </plugin>
        </plugins>
    </build>
</project>
*注意:本文后续所有服务pom.xml中的都使用如下配置
<parent>
  <groupId>com.lin</groupId>
  <artifactId>spring-cloud-parent</artifactId>
  <version>1.0-SNAPSHOT</version>
</parent>
服务注册与发现——Eureka
SpringCloud中的所有服务之间的交互都是基于注册中心,这里就用Eureka注册中心组件搭建服务。
注册中心
首先新建一个eureka-server服务,需要额外添加依赖spring-cloud-starter-netflix-eureka-server
<dependency>
  <groupId>org.springframework.cloud</groupId>
  <artifactId>spring-cloud-starter-netflix-eureka-server</artifactId>
</dependency>
启动一个服务注册中心只需要在Springboot启动类上添加一个注解@EnableEurekaServer
@SpringBootApplication
@EnableEurekaServer
public class EurekaServerApplication {

    public static void main(String[] args) {
        SpringApplication.run(EurekaServerApplication.class, args);
    }

}
另外,我们还需要配置eureka使用的端口,registerWithEureka和fetchRegistry来标明这是一个eureka-server服务,配置好serviceUrl.defaultZone, application.yml文件内容如下:
server:
  port: 8761

eureka:
  instance:
    hostname: localhost
  client:
    registerWithEureka: false
    fetchRegistry: false
    serviceUrl:
      defaultZone: http://${eureka.instance.hostname}:${server.port}/eureka/
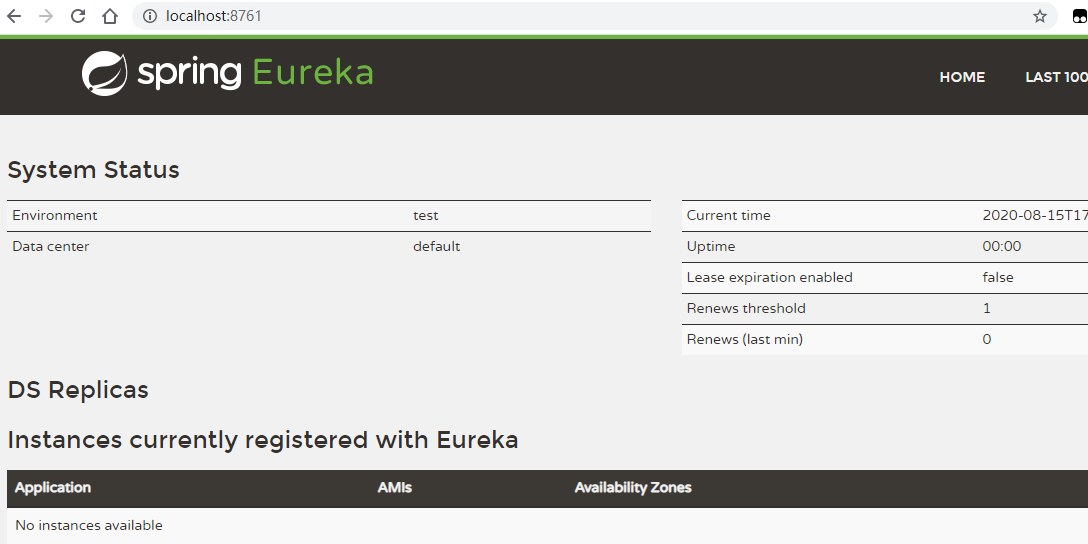
现在eureka-server服务已经配置完成,接下来就只要启动注册中心服务就好了。使用浏览器访问http://localhost:8761/ 可以看到如下界面
服务提供者和服务消费者
其实相对eureka-server服务来说,其他的eureka-client服务本身既可以是服务提供者,也可以是服务消费者,所以我们把spring-cloud-starter-netflix-eureka-client和spring-boot-starter-web添加到parent主工程中,新建一个service-hi服务,
<dependency>
  <groupId>org.springframework.cloud</groupId>
  <artifactId>spring-cloud-starter-netflix-eureka-client</artifactId>
</dependency>
<dependency>
  <groupId>org.springframework.boot</groupId>
  <artifactId>spring-boot-starter-web</artifactId>
</dependency>
添加完依赖之后在SpringBoot启动类中添加 @EnableDiscoveryClient :
@SpringBootApplication
@EnableDiscoveryClient
public class ServiceHiApplication {
    public static void main(String[] args) {
        SpringApplication.run(ServiceHiApplication.class, args);
    }
}
接着需要配置spring.application.name和需要注册到eureka的地址eureka.client.serviceUrl.defaultZone, application.yml内容如下:
server:
  port: 8762

eureka:
  client:
    serviceUrl:
      defaultZone: http://localhost:8761/eureka/
spring:
  application:
    name: service-a
添加一个Controller接口提供给其他服务,HelloController类:
@RestController
public class HelloController {
    @Value("${server.port}")
    String port;

    @RequestMapping("/hi")
    public String home(@RequestParam(value = "name", defaultValue = "forezp") String name) {
        return "hi " + name + " ,i am from port:" + port;
    }
}
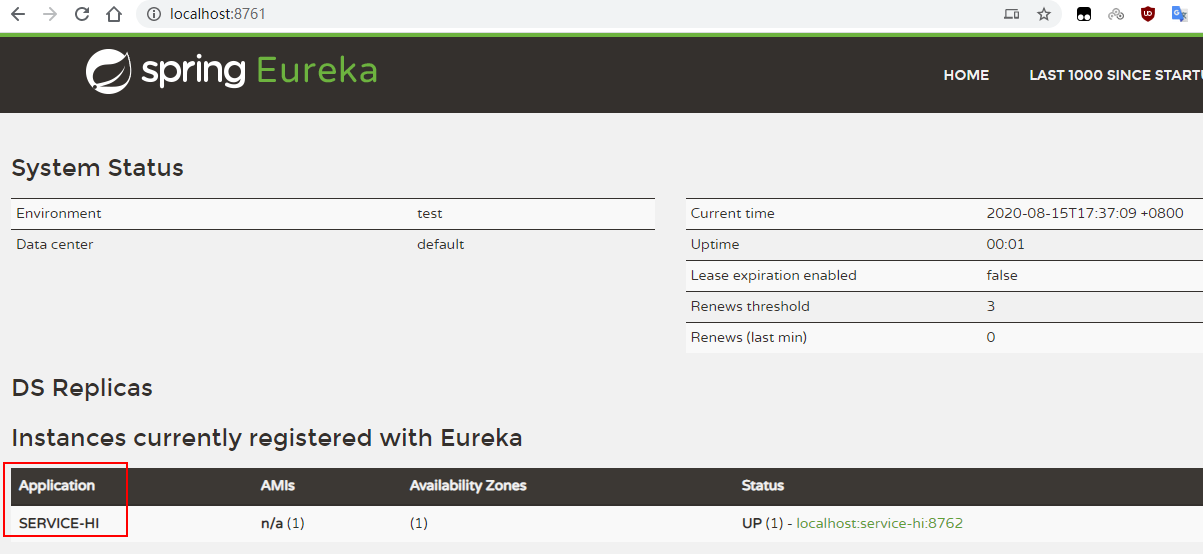
启动服务后使用浏览器访问 http://localhost:8761/ 就可以看到service-hi服务已经启动
hi lin ,i am from port:8762
服务间通讯与负载均衡
在微服务架构中,业务都会被拆分成一个独立的服务,服务与服务直接的通讯是基于http restful的,Spring Cloud有两种服务调用方式,一种是Ribbon+RestTemplate,另一个是feign。
Ribbon+RestTemplate
在使用Ribbon之前,先启动eureka-server服务,再利用idea启动两个service-hi服务,端口分别为8762和8763,我们利用两个端口对应的service-hi服务模拟一个小的集群。基于上面小节所介绍的消费者服务搭建基础上新建一个service-ribbon服务,在pom.xml中添加ribbon依赖:
<dependencies>
  <dependency>
  <groupId>org.springframework.boot</groupId>
  <artifactId>spring-boot-starter-web</artifactId>
  </dependency>
  <dependency>
    <groupId>org.springframework.cloud</groupId>
    <artifactId>spring-cloud-starter-netflix-eureka-client</artifactId>
  </dependency>
  <dependency>
    <groupId>org.springframework.cloud</groupId>
    <artifactId>spring-cloud-starter-netflix-ribbon</artifactId>
  </dependency>
</dependencies>
服务配置文件指定的服务的注册中心地址为http://localhost:8761/eureka/,服务名为service-ribbon,端口为8764,配置文件application.yml如下:
eureka:
  client:
    serviceUrl:
      defaultZone: http://localhost:8761/eureka/
server:
  port: 8764
spring:
  application:
    name: service-ribbon
使用RestTemplate实现服务间远程调用需要将RestTemplate添加到spring ioc容器中,可以直接在启动类上注入RestTemplate bean或者在Configuration类中注入RestTemplate bean;并通过@LoadBalanced注解表明RestTemplate开启负载均衡的功能。
@SpringBootApplication
@EnableDiscoveryClient
public class ServiceRibbonApplication {

    public static void main(String[] args) {
        SpringApplication.run(ServiceRibbonApplication.class, args);
    }

    /**
     * 将RestTemplate添加到spring ioc容器里面
     * @return
     */
    @Bean
    @LoadBalanced
    RestTemplate restTemplate() {
        return new RestTemplate();
    }
}
编写一个测试类HelloService,通过使用ioc容器中的RestTemplate调用service-hi服务中的"/hi"接口,这里可以直接永程序名替代具体的url地址,在ribbon中会先根据服务名来选择具体的服务实例,再根据服务实例在请求会用具体的url代替服务名,代码如下:
@Service
public class HelloService {
    @Autowired
    RestTemplate restTemplate;
    public String hiService(String name) {
        return restTemplate.getForObject("http://SERVICE-HI/hi?name="+name,String.class);
    }
}
编写一个HelloController类,在HelloController中调用HelloService:
@RestController
public class HelloController {
    @Autowired
    HelloService helloService;
    @GetMapping(value = "/hi")
    public String hi(@RequestParam String name) {
        return helloService.hiService( name );
    }
}
此时使用浏览器多次访问 http://localhost:8764/hi?name=lin,浏览器交替显示:
hi lin ,i am from port:8762 hi lin ,i am from port:8763
此时的架构
- 一个服务注册中心,eureka server,端口为8761
- service-hi工程跑了两个实例,端口分别为8762,8763,分别向服务注册中心注册
- service-ribbon端口为8764,向服务注册中心注册
- 当service-ribbon通过RestTemplate调用service-hi的hi接口时,因为用ribbon进行了负载均衡,会以轮询的方式调用service-hi:8762和8763两个端口的hi接口;
Feign调用
在使用Feign之前,需要先了解feign是集成了ribbon的,feign的负载均衡策略默认为ribbon的轮询策略,也就是说在通过feign调用接口可以实现和ribbon一样的效果,接着在项目中新建service-feign服务,添加spring-cloud-starter-openfeign依赖:
<dependencies>
  <dependency>
    <groupId>org.springframework.cloud</groupId>
    <artifactId>spring-cloud-starter-openfeign</artifactId>
  </dependency>
</dependencies>
想要使用feign必须启动类上添加注解@EnableFeignClients
@SpringBootApplication
@EnableDiscoveryClient
@EnableFeignClients
public class ServiceFeignApplication {
    public static void main(String[] args) {
        SpringApplication.run(ServiceFeignApplication.class, args);
    }

}
service-feign服务同样需要配置eureka.client.serviceUrl.defaultZone为eureka的地址
eureka:
  client:
    serviceUrl:
      defaultZone: http://localhost:8761/eureka/
server:
  port: 8765
spring:
  application:
    name: service-feign
编写一个HelloService调用service-hi服务中的接口(之前小节所编写的接口)
@FeignClient(value = "service-hi")
public interface HelloService {
    @GetMapping("/hi")
    String sayHiFromClientOne(@RequestParam(value = "name") String name);
}
另外在service-feign服务中添加一个Controller接口给外部调用
@RestController("/hi")
public class HelloController {
    @Autowired
    private HelloService helloService;

    @GetMapping(value = "/hi")
    public String sayHi(@RequestParam String name) {
        return helloService.sayHiFromClientOne( name );
    }
}
使用浏览器访问接口 http://localhost:8765/hi?name=luo,交替返回如下内容:
hi luo ,i am from port:8762
hi luo ,i am from port:8763
Hystrix 断路器
在微服务架构中,根据业务来拆分成一个个的服务,服务与服务之间可以相互调用(RPC),在Spring Cloud可以用RestTemplate+Ribbon和Feign来调用。为了保证其高可用,单个服务通常会集群部署。由于网络原因或者自身的原因,服务并不能保证100%可用,如果单个服务出现问题,调用这个服务就会出现线程阻塞,此时若有大量的请求涌入,Servlet容器的线程资源会被消耗完毕,导致服务瘫痪。服务与服务之间的依赖性,故障会传播,会对整个微服务系统造成灾难性的严重后果,这就是服务故障的“雪崩”效应。为了解决这个问题,业界提出了断路器模型。
ribbon 使用短路器
hi lin ,i am from port:8762
hi,lin,sorry,error!
feign使用断路器
路由网关 Zuul
Zuul的主要功能是路由转发和过滤器。路由功能是微服务的一部分,比如/api/user转发到到user服务,/api/shop转发到到shop服务。zuul默认和Ribbon结合实现了负载均衡的功能。